Leonardo AI opens the door to personalized model training for image generation, making it accessible for beginners and experts alike.
In this step-by-step guide, I’ll dive into the world of custom models and explore how you can craft your very own.
Table of Contents
What are Leonardo’s AI Models?
Today, our focus is on the models that power image generation. But first, let’s understand what these models are all about.
When you venture into the AI image generation section, you’ll encounter the option to select the model Leonardo AI will employ. Each model possesses unique capabilities.
Take, for instance, the default versions like Dreamshaper V5, Leonardo Diffusion Creative Select, Signature Stable Diffusion 1.5, Stable Depiction 2.1, and the ability to select a custom model.
When you opt for a specific model, such as the “Select Custom Model,” you’ll be presented with various versions in the platform models section.
A model, in essence, uses a set of photos as a foundation to generate specific designs.
For instance, consider a vintage-style photography model. If you select this model and input a prompt like “walking down the deep forest,” the resulting image will exhibit a vintage aesthetic, as seen in the provided example.
Each model comes with its unique instant prop, a keyword that activates the specific model.
Watch out: Best AI Tools
Let’s Create Our Own Model
In this tutorial, I will guide you through the process of creating your custom model, a straightforward endeavour.
Training & Datasets
Start by navigating to the “Training and Data Sets” section on the left side.

Create New Dataset
Here, select “New Data Set” and give it a name of your choice, along with a description. Afterwards, click “Create Data Set.”

Upload Images
Uploading a data set image is the next step, and it is recommended to use between 8 to 15 similar images. These images serve as a reference for the model’s output style. The maximum upload limit is 40 images.

For example, you can utilize the Gallery search for inspiration, like the sticker design shown here. Though I have only four images for this example, you ideally want more for a comprehensive model.
Final Settings
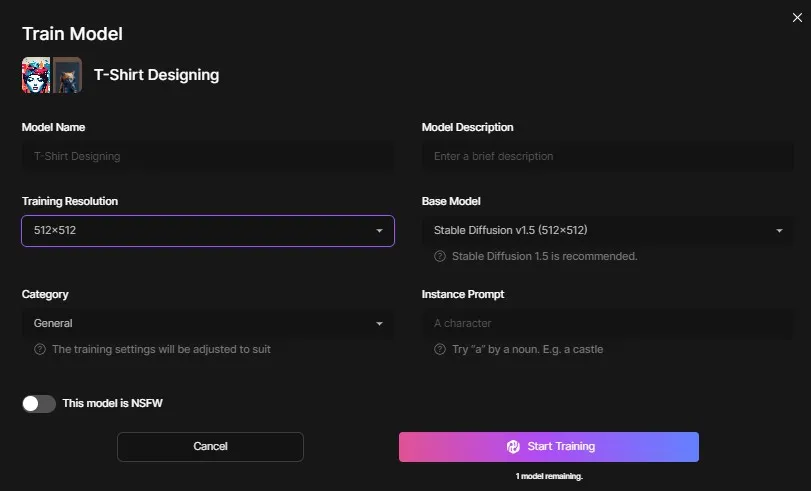
Now, click on “Train Model” to initiate the training process.
Here, you can fine-tune various training settings, including the model name, description, training resolution, base model (1.5 or 2.1), and category (e.g., illustration or vector).

The instant prop, like a “sticker,” is vital, as it activates the model. Click “Start Training,” and an email will notify you when the training is complete.
Start Training
Depending on the data set’s size, this process may take from 30 minutes to a few hours. You can monitor the training progress by clicking on “View Status.”
Once the model is trained, you can use it to generate images. In the AI image generation section, click on “Models,” select “Custom Models,” and you’ll find the models you’ve created.
Alongside your custom models, you’ll also find your favourite and platform models. To use your custom model, follow these steps:
- Choose your model (e.g., “A Burning Obsidian Axe”).
- Click “Generate with this model.”
- Identify the instant prop (e.g., “axe”).
- Craft your prompt (e.g., “a burning obsidian axe”).
- Click “Generate.”
The model will create an image based on your prompt and the reference images used during training.
Experiment with different models to achieve varying styles, from anime to photorealistic designs. Remember, the more reference images you provide, the better your model will reflect your desired style.
Also Read: Create Coloring Pages using Leonardo AI
My Thoughts
In conclusion, I’ll say Leonardo AI empowers you to train custom models for image generation, unlocking a world of creative possibilities.
Whether you’re looking to add a vintage touch or create unique illustrations, this guide has laid out the steps for you to get started on your AI journey.
